Ask Crystal: Nail Trims at Home

Welcome to “Ask Crystal,” where you can ask your pet behavior questions! You can submit your question for Crystal at the bottom of the page!

Dear Crystal,
I just adopted a dog and his nails are so long. It looks like they have never been cut before. He pulls his paws away when I try to pick them up so I am not sure how he will react to nail trims. I want to do things the right way. How do I get him okay with having his nails trimmed?
Sincerely,
Needs a Mani
Dear Needs,
Most dogs don’t naturally enjoy a nail trim the way we enjoy our mani-pedis. There are a few different reasons why a dog might not like having their nails cut. Dogs don’t usually enjoy having their paw held. Dogs don’t naturally hold each other’s paws. Some dogs dislike the restraint that most people use when clipping nails. The pressure of the nail being cut may feel uncomfortable even if it doesn’t hurt. If the dog has had his quick cut, that is painful and some dogs seem to remember that one time their quick was cut. It may be that the sound of the nail being cut is averse to them as well. Luckily, you can get your dog to tolerate nail trims if not enjoy them with some training.
To change a dog’s emotions about something we need to create a desensitization and counter conditioning protocol. Desensitization means exposure to the trigger at a level which the dog does not react fearfully. Counter conditioning means to condition a new behavior. To create a plan, we need to break the behavior down into small pieces. To do this you really have to think each part of the action of cutting the dog’s nails step by step.
You will need some amazing treats for this training. Boiled or canned chicken breast works great for most dogs. Locate the area on your dog near his paws where you are able to touch him without him reacting fearfully. This might be his elbow or maybe even his shoulder. Have the treats in one hand behind your back or somewhere out of the dog’s frame of vision. Start out by briefly touching the area on the dog with the empty hand and then feed him a treat from your other hand. Repeat this until when you touch that spot on the dog and you can see the dog thinking, “Where’s my chicken?”. Once you get this response do several more repetitions.
We can now begin working on the duration of the touch. Slowly begin increase the length of time that you are touching the dog before treating. Try to work up to 8-10 seconds. The dog may go back to mild discomfort as you increase the time but we are looking for the “where’s my chicken?” look before increasing duration.
Once you get to the desired duration, you can then move the place you are touching a little lower. Start at the beginning location and slide your hand down an inch or two. Ease up on the duration and begin working up to the longer duration.
When you are touching below the dog’s elbow, begin to add pressure to the touch. When you begin adding pressure, ease up on the duration again. We always want to ease up on the other criteria when we make one criteria harder. Build up your duration slowly with the increased pressure.
When you have worked your way to the paw, add grasping the paw without picking the paw up, again slowly build up in the duration. Then add pressure to the paw grasp. When the dog is happily accepting that touch, add in picking up his paw and build up duration.
Now we can introduce the clippers or the grinder, show the dog the tool and treat. Put it behind your back and repeat presenting it and treating until you get the “Where’s my chicken look?”. Next we need to introduce the dog to the sound of the clippers or grinder. Make the noise briefly and treat.
The next step would be to begin to put the picture together. Grab the paw, click the clippers right next to the nail and treat. Once the dog is comfortable with that, cut one nail, treat and stop. Rather than cutting all the nails at one time, try cutting one nail a day so that you aren’t overwhelming the dog. As he gets more comfortable with it, you can increase the number of nails cut in one session until you can get to all of them in one session if you want.
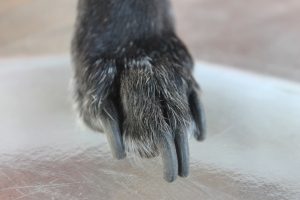 There are some cool tricks that you might find helpful as well. If you have a dog with black nails and are nervous about cutting the quick, they make nail clippers that can sense where the dog’s quick is with heat sensors. You can also put your phone’s flashlight under your dog’s nail to get better view. You can also just cut tiny slivers off at a time and check for the quick. The quick looks like a black dot in white inside of the nail. When you see that dot you are approaching the quick and you want to stop. If you do cut the quick, a little dab of styptic powder will stop it.
If your dog has had a really terrible reaction to nail trims, you can actually teach your dog to sand down their own nails using a board with very small grit sandpaper glued to it. There are already made boards you can purchase if you aren’t feeling handy enough to make one. This will require training to teach the dog how to do it but might be easier to teach for some dogs.
These procedures can be time consuming. It can take several weeks of work to get your dog feeling better about nail trims. But considering how often we have to cut a dog’s nails and the life of the dog, it is time well spent. Even if you take your dog to the vet for the trims, if left untreated their behavior can get worse and then the dog may need to be muzzled or sedated for trims at the vet. It really isn’t something that we want to ignore. If you follow this plan, hopefully you will be on the road to stress free nail trims. Happy training!
Until next time,
Crystal